How to Build a Shelter for Survival: A Step-by-Step Guide
Quick Answer: A survival shelter’s job is simple: stop you from losing body heat. Pick a site away from flood zones and dead trees, build small enough to fit your body, and insulate the ground as heavily as the roof. A basic lean-to or debris hut, built in under two hours, stops exposure: the fastest killer in a wilderness emergency.
J.T. Wilder | Survival strategist, Survival Tactix | Last updated: July 1, 2026
No affiliate links in this guide: just the skills. If you’d rather buy a backup shelter than build one from scratch, see our Best Survival Tents guide.
Jump to: Why Shelter Matters · Choosing a Site · Shelter Types by Environment · Step-by-Step Builds · Materials & Insulation · Fire, Weather & Safety · Not in the Wild? Vehicle & Home Sheltering · Common Mistakes · FAQ
When you’re out in the wild, nature doesn’t always play nice. Whether you’re lost in the forest, trekking through the mountains, or caught in a sudden storm, one thing becomes clear fast: you need shelter. Without it, exposure to the elements can turn a bad situation into a deadly one.
This guide walks through how to choose a site, pick the right shelter for your environment, and build six proven designs with what you’ve got on hand: plus what to do when the “wilderness” is actually your car or your own living room during a power outage.
Why Does Shelter Matter More Than Water or Food?
Survival instructors often teach a rough rule of thumb called the “Rule of Three”: roughly three minutes without air, three hours without shelter in harsh conditions, three days without water, three weeks without food. It’s a teaching heuristic, not a medical guarantee: actual survival time depends heavily on temperature, wind, wetness, and your physical condition: but the ordering holds up. After air, shelter usually outranks water and food.
The reason is exposure. According to the National Weather Service, hypothermia begins when your core body temperature drops below 95°F (normal is roughly 98.6°F), and it can happen in air temperatures as mild as 50°F if you’re wet or wind-exposed. The CDC’s winter weather guidance lists uncontrollable shivering, slurred speech, and confusion as early warning signs: and confusion is exactly what makes hypothermia dangerous, because it can stop you from recognizing you’re in trouble.
A shelter’s entire job is to slow that heat loss: block wind, block rain and snow, and put insulation between your body and the cold ground. It’s not a niche skill, either: the National Park Service lists emergency shelter among its “Ten Essentials” for any backcountry trip, right alongside navigation, fire, and first aid.
How Do You Choose the Right Shelter Site?
Before you gather a single stick, ask: where am I building this? A great shelter in the wrong spot is a disaster waiting to happen.
- Stay off low ground. Dry riverbeds, gullies, and valley floors collect flash-flood water and pooled cold air.
- Check overhead. Look up before you commit to a spot: dead branches (“widowmakers”) and unstable trees are a real hazard.
- Use natural windbreaks. Large rocks, tree lines, and hillsides cut wind exposure before you build a single wall.
- Stay near water, not on top of it. Close enough to walk to, far enough that flooding or wildlife traffic isn’t an issue.
- Confirm flat, dry ground. Building on a slope or a depression means water runs straight into your shelter in the first rain.
The survival triangle: shelter, water, and fire form the core of most wilderness survival plans: miss one and your odds drop fast. If conditions are harsh (cold, wet, or windy), prioritize shelter first; you can survive far longer without water or fire than you can without protection from exposure.
Which Shelter Type Fits Your Environment?
Different environments call for different shelters. Here’s the fast-reference version:
| Environment | Best shelter type |
|---|---|
| Forest | Lean-to or debris hut |
| Snow-covered terrain | Snow cave or quinzee |
| Desert | Shade-based, elevated shelter |
| Mountains / rocky terrain | Rock overhang or windbreak |
| Have a tarp or poncho? | Tarp shelter (any environment) |
The next section covers the five most reliable, beginner-friendly builds: plus what to do when nature has already done some of the work for you.
How Do You Actually Build Each Type of Shelter?
1. The Lean-To Shelter
The fastest shelter to build, and a good default when you’re short on time or energy.
- Find a long, sturdy branch and rest it between two trees or rock outcrops, about waist-to-chest height.
- Lean smaller sticks against it at an angle, spaced closely.
- Layer branches, leaves, or bark over the frame for wind and rain resistance.
Build time: roughly 20–30 minutes for a basic version.
2. The A-Frame Shelter
A tent shape built entirely from natural materials: good coverage on both sides.
- Lay a thick ridgepole between two supports (standing trees work best).
- Lean sticks against both sides at a steep angle.
- Cover with leaves, grass, or bark, working from the bottom up like shingles so water sheds instead of soaking in.
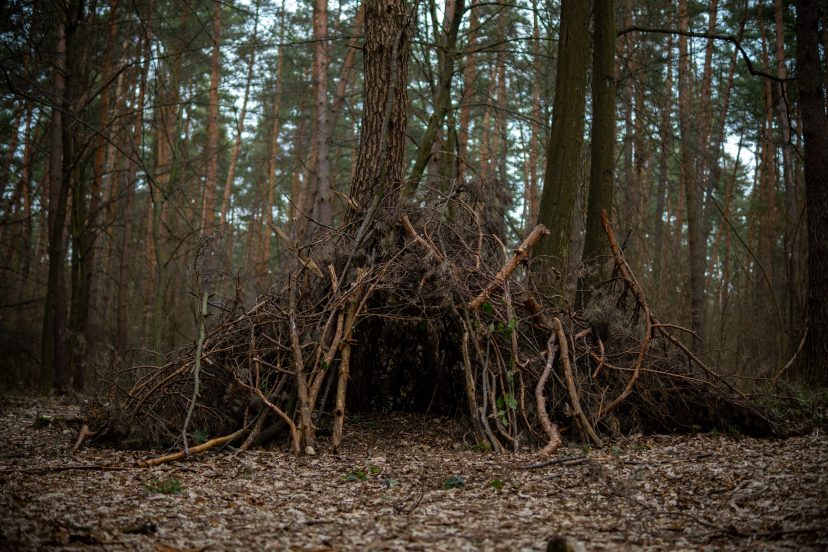
3. The Debris Hut
The best solo, cold-weather shelter: compact, well-insulated, and low-profile.
- Prop a ridgepole against a forked stick or stump to form the spine.
- Stack sticks along both sides to form a narrow triangular frame: just wide enough for your body.
- Heap on debris (leaves, grass, pine needles) until the walls are roughly two feet thick. Thickness is what makes this shelter work; a thin debris hut barely outperforms no shelter at all.
4. The Tarp Shelter
If you’re carrying a tarp, poncho, or even a heavy-duty trash bag, this is usually your fastest, driest option.
- Plow point: Stake three corners to the ground, tie the fourth corner up to a tree for an angled wind block.
- A-frame tarp: Tie a ridgeline between two trees, drape the tarp over it, and stake down both sides.
5. Snow Shelters
Counterintuitive but true: snow insulates. A properly built snow shelter can hold a stable interior temperature well above the outside air.
- Snow cave: Dig into a snowbank with a low, tunnel-style entrance below a raised sleeping platform: cold air sinks and drains out the low door instead of pooling around you.
- Quinzee: Pile snow into a dome roughly shoulder-height, let it sinter (harden) for 1–2 hours, then hollow it out from a small entrance.
6. Natural Shelter Hacks
Sometimes the terrain has already done the work:
- Caves and overhangs: check for animal signs (tracks, scat, dens) before committing.
- Fallen trees: a downed trunk with room to crawl under, walled with leaned branches, is one of the fastest shelters available.
- Dense thickets: solid wind protection with minimal building.
What Materials and Insulation Actually Keep You Warm?
You don’t need much: most of a good shelter is already lying on the ground around you.
- Framework: sticks and branches
- Insulation and waterproofing: leaves, moss, bark, pine needles
- Binding: vines, cordage, or paracord if you have it
Insulation is the part most people skip: and it’s the part that matters most. Ground contact pulls heat out of your body far faster than cold air does. Line the floor with a thick layer of dry leaves or pine needles before you ever lie down, and keep your body fully off bare ground. Layer roofing material thickly enough that you can’t see daylight through it.
Ventilation still matters. A sealed shelter traps moisture from your own breath and body heat, and can turn dangerous fast if you’re running a fire inside. Always leave a small, deliberate air gap.
Size small, on purpose. A shelter built just big enough to sit up and lie down in is dramatically easier to keep warm than a roomy one. Bigger is not better here: it’s colder.
How Do Fire, Weatherproofing, and Safety Work Together?
Fire and shelter work together, carefully. A reflective wall behind a small fire bounces heat back into your shelter, but keep flame at a safe distance from your debris walls: dry insulation material ignites fast. If the ground is wet, build a fire bed (a base layer of rocks or dry wood) before lighting anything. For the fire-starting side of this, what actually gets a flame going in wet or cold conditions, see our Best Fire Starters guide.
Weatherproof the roof. Angle it steep enough that rain runs off instead of pooling, and layer bark, grass, or leaves like shingles, bottom to top.
Windproof the structure. Face your entrance away from prevailing wind, bank extra debris on the wind-facing side, and use logs or rocks as a windbreak if the site allows it.
Maintain it daily. Shelters aren’t “done” once built: add debris if the roof sags, check for leaks after rain, and swap out anything that’s gone moldy or wet.
What If You’re Not in the Wilderness: a Car or Your Own Home?
Most shelter guides stop at bushcraft. But for a lot of readers, the “survival situation” is a car stuck in a snowstorm or a power outage at home: not a week in the backcountry. A few adaptations:
- Stranded in a vehicle: Stay with the car: it’s a far better shelter and far easier to find than you are on foot. Run the engine sparingly for heat (10 minutes per hour is a common guideline), keep a window cracked for ventilation, and use anything on hand (blankets, floor mats, extra clothing) as insulation between you and cold seats or the floor.
- Sheltering in place at home during an outage: The same core rule applies: insulate first, then heat. Close off and gather in one small room rather than heating the whole house, block drafts under doors, and layer clothing and blankets before reaching for a backup heat source. For the fuller household version of this, see our Cold Weather Survival guide and our Natural Disaster Survival guide.
- Apartment or urban emergency: You likely won’t be building a debris hut on a balcony: but the “insulate, then heat, then ventilate” order still applies during a heating or power failure. Start with your household emergency plan in Being Prepared for Emergencies.
Do You Need Tools to Build a Shelter?
A knife or hatchet speeds up almost every step here: cutting a clean ridgepole, splitting kindling, stripping bark. But every design above is doable without tools, using sharp rocks, sheer force, and patience. It’s slower, not impossible.
What Are the Most Common Shelter-Building Mistakes?
- Building too big. More space means more cold air to heat with your own body.
- Skipping ground insulation. This is the single most common, and most costly, shortcut.
- Building in a depression or dry riverbed. Looks sheltered, floods fast.
- Forgetting ventilation, especially with a fire nearby.
- Overspending energy. A shelter that costs you your last reserves of strength isn’t a win, even if it looks good.
How Do You Camouflage a Shelter for Concealment?
If staying hidden matters in your situation, blend the shelter into its surroundings: cover it with local leaf litter, break up straight lines with loose branches, and avoid a visible smoke column if concealment is the priority over signaling.
Why Does a Bigger Shelter Keep You Colder?
The most common beginner mistake with a debris hut is building it roomy. A shelter tall enough to sit up in looks impressive in a photo, but every extra bit of air inside is space your body has to heat on its own, and it never catches up. The usual result is a long, shivering night instead of sleep.
The fix is to build deliberately, almost uncomfortably small: just wide enough to lie in, low enough that the roof sits about a hand’s width above you, with a thick layer of dry debris packed underneath. Same materials, half the size, and the shelter finally holds your heat. If it feels a little tight crawling in, you’ve probably built it right.
A Word of Encouragement
Learning to build a shelter can feel like one more thing on an already long preparedness list. It isn’t. It’s one skill, practiced once in your backyard or on a weekend hike, that you’ll never have to think hard about again. You don’t need to master all six designs above: pick one, like the lean-to, and build it once just to see how the pieces fit together. That single afternoon of practice is worth more than reading ten more articles about it.
FAQ
How long does it take to build a survival shelter? It depends on the design and materials on hand. A basic lean-to can take 20–30 minutes; a well-insulated debris hut usually takes 2–3 hours. Practice cuts that time significantly.
What’s the best shelter for cold weather? A debris hut or snow cave, because both insulate body heat effectively when built small and packed thick. Pair shelter with layering and fire strategy in our Cold Weather Survival guide.
Can I build a shelter without tools? Yes. Sharp rocks can cut, vines can bind, and sticks provide structure. It takes longer, but it’s fully doable.
What’s the most common mistake people make? Building too large and skipping ground insulation. Bigger isn’t better: a small, well-insulated shelter beats a roomy, drafty one every time.
How do I make my shelter waterproof? Layer leaves, bark, or moss like shingles, working bottom to top, and angle the roof steeply enough that rain runs off instead of soaking through.
What if I’m not in the wilderness, what if it’s my car or my home? The same core principle applies: insulate before you try to heat. See the Not in the Wild section above for vehicle and home-specific steps.
Conclusion: Shelter Is Your Survival Home
When you’re stripped of comfort, your shelter becomes your home base and your lifeline. Building one isn’t just about sticks and leaves: it’s about taking control in a situation that otherwise feels out of your hands. Whether you’re deep in the backcountry, stuck in a stranded car, or riding out a power outage at home, the same rule applies: find a good site, insulate more than you think you need to, build small, and stay off the ground.
Next step: Pick one design from this guide, the lean-to is the fastest place to start, and build it once, somewhere low-stakes, before you ever need it for real.
Worth reading alongside this: shelter decisions look different under real pressure. Our real-life survival case studies break down what actually kept people alive in three documented incidents, and what each one teaches about preparation.